In the vibrant world of culinary arts, the presentation of a dish is almost as crucial as its taste. And in today's visual-first digital landscape, compelling food photography is no longer a luxury but a necessity for anyone looking to showcase their culinary creations. While ingredients and recipes form the foundation, it's the masterful application of light and color that truly elevates a simple snapshot into a mouth-watering masterpiece. These elements are not just technicalities; they are the brushstrokes that paint emotion, tell a story, and ultimately, entice the viewer. Understanding the power of light and color is among the most impactful food photography tips you can embrace to transform your aesthetic.
The Illuminating Role of Light in Food Photography
Light is the undisputed king of photography, and in food photography, its reign is absolute. It's not merely about brightness or darkness; light sculpts, defines, and breathes life into your dishes, dictating the mood, atmosphere, and overall vibrancy of your image. Mastering light is perhaps the single most important of all food photography tips.
Natural Light: Your Best Friend (Mostly)
For most food photographers, especially beginners, natural light is the ideal starting point. Soft, diffused natural light—think of a cloudy day or the light coming through a window—is incredibly flattering. It wraps around your subject, minimizing harsh shadows and revealing textures with gentle grace. Experiment with its direction:
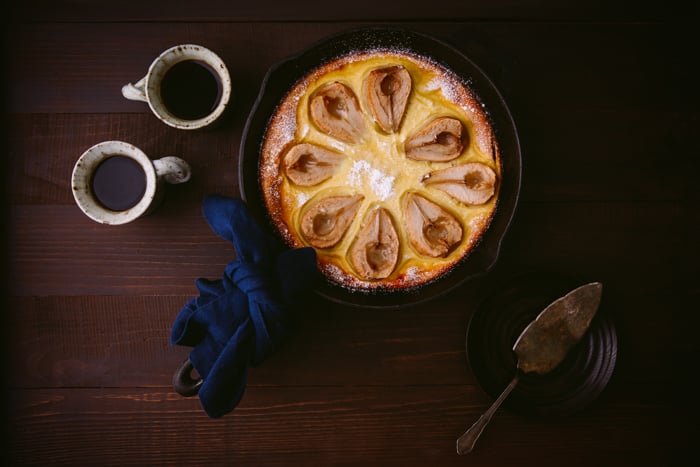
- Side Light: This is often considered the gold standard. Light coming from the side creates beautiful shadows that add depth and dimension, making your food look three-dimensional and appealing. It highlights textures, from the flakiness of a pastry to the glistening surface of a sauce.
- Back Light: Positioned behind your dish, backlighting creates a magical glow, especially around translucent elements like drinks or saucy dishes. It can make edges sparkle and add a sense of drama, but be careful to use a reflector or fill light to prevent the front of your dish from appearing too dark.
- Front Light: While straightforward, direct front light can sometimes flatten your subject, washing out details and textures. It's generally less preferred for creating depth but can work well for certain minimalist or bright compositions, especially when heavily diffused.
To harness natural light effectively, consider using simple tools like a white foam board as a reflector to bounce light back onto your dish, filling in shadows. A translucent curtain or sheer fabric can act as a diffuser, softening harsh direct sunlight into a more even, flattering glow. The quality and direction of light directly influence how colors appear, enhancing their saturation or softening their tones.
Crafting Visual Stories with Color Palettes
Beyond light, color is the other powerful aesthetic tool in your food photography arsenal. It’s not just about showcasing the vibrant hues of your ingredients; it's about leveraging color psychology to evoke specific emotions and create a cohesive visual narrative. Strategic use of color is a critical food photography tip for captivating your audience.
The Psychology of Food Colors:
- Reds & Oranges: Often associated with warmth, energy, and appetite. Think of juicy tomatoes, fiery chilies, or autumnal soups. These colors can make food appear more inviting and stimulating.
- Greens: Convey freshness, health, and natural goodness. Perfect for salads, herbs, or vibrant vegetable dishes.
- Yellows: Evoke happiness, cheerfulness, and brightness. Lemons, corn, or golden-baked goods can instantly uplift a photo.
- Blues & Purples: Less common in natural food tones, but often used for unique desserts or drinks. Blue can be calming, while purple can signify luxury or creativity. Use these sparingly as accent colors to avoid making food seem unappetizing.
Choosing Your Color Scheme:
Your choice of color palette sets the mood. If your goal is to convey a general mood of abundance and vibrancy, a wider range of complementary colors can work. However, if you aim to evoke a specific emotional response or create a highly cohesive and elegant look, limiting your palette to a few well-chosen colors is often more effective. This consistency makes your photos easier on the eyes and helps viewers focus on the star of the show – your dish. Too many clashing colors or an overly cluttered setup can overwhelm and distract.
Some powerful color combinations include:
- Complementary Colors: These sit opposite each other on the color wheel and create high contrast, making elements pop. Examples include red and green (think festive berries on a mint garnish), blue and orange (a blueberry tart on an orange plate, or a vibrant curry with cool blue accents), or purple and yellow (eggplant alongside saffron rice).
- Analogous Colors: These are adjacent on the color wheel and create a harmonious, soothing feel. For instance, varying shades of yellow, orange, and red can create a warm, inviting scene perfect for autumnal dishes.
- Monochromatic: Using different shades, tints, and tones of a single color creates a sophisticated and minimalist aesthetic, focusing more on texture and form.
Harmonizing Props and Colors for Aesthetic Appeal
Props are vital supporting characters in your food photography, enhancing the narrative and elevating the overall aesthetic. However, just like with light and color, they must be used judiciously. The right props, chosen with an eye for color coordination, are essential food photography tips for creating captivating images.
When selecting props, consider how their colors and textures relate to your dish. If you're photographing a burrito, fresh limes, vibrant cilantro, or scattered pico de gallo can not only highlight ingredients but also add bursts of complementary color without overshadowing the main subject. The key is to ensure props are never the center of attention in terms of color or pattern; they should serve as subtle backdrops or accent pieces that deepen the story. A rustic wooden board might enhance a wholesome, earthy dish, while a sleek ceramic plate could complement a modern, refined dessert. Always remember that your dish remains the ultimate focus, and props are there to elevate its appeal, not compete with it.
Strategic Framing and Focus for Impact
Once you’ve mastered light and color, the next step in enhancing your food photography aesthetics is through thoughtful framing and focus. Experimenting with camera angles and depth of field are crucial food photography tips that can dramatically alter how your dish is perceived.
Angles and Perspective: Just as people have their best angles, so do dishes. Don't be afraid to experiment:
- Overhead (Flat Lay): This top-down perspective is excellent for showcasing the entire composition of a meal, especially dishes with many components like a grazing board or beautifully plated pasta. It creates a graphic, artistic feel.
- 45-Degree Angle: Often called the "diner's perspective," this angle mimics how you'd naturally see your food. It offers a good balance, showing both the top and some side elements, making it versatile for most dishes.
- Straight-On (Eye-Level): Ideal for highlighting height, layers, or intricate details on the side of a dish, such as a stacked burger, a layered cake, or a tall glass of a colorful beverage.
Regardless of the angle, your dish must remain the sole focus. This is where depth of field comes into play. By using a wider aperture (smaller f-stop number), you can achieve a shallow depth of field, blurring your background (known as bokeh) and making your dish pop. This technique effectively isolates your subject, ensuring that distracting elements in the backdrop don't steal the spotlight. Similarly, be mindful of how much you zoom in; while highlighting a main ingredient can be effective, ensure it doesn't lose context. Sometimes, a subtle flash can be used to freeze motion or sharpen focus on a particular detail, but generally, a soft, diffused light works best for overall food appeal.
Consistency is Key: Branding Through Light and Color
For businesses or personal brands, consistency in food photography is paramount. Your choice of lighting style, color palette, prop selection, and even editing aesthetic all contribute to your unique brand identity. Whether it's promotional posters, social media posts, or website images, maintaining a consistent visual language ensures that your culinary creations are instantly recognizable and memorable across all channels.
A consistent approach to light might mean always using soft, natural window light for a bright, airy feel. A consistent color palette could involve favoring warm, rustic tones for a comfort food brand, or cool, minimalist hues for a modern, gourmet offering. This deliberate alignment of aesthetic choices with your brand's personality builds trust, reinforces professionalism, and creates a powerful, recallable image in the minds of your audience.
The journey of food photography is one of continuous experimentation and discovery. By thoughtfully leveraging the power of light and color, understanding composition, and staying true to your brand, you can create images that don't just show food, but truly celebrate it. These fundamental food photography tips are your toolkit for crafting irresistible visual stories, one delicious shot at a time.
